Detailed drill diagrams of erhu finger movements
The following are four types of finger movements on the erhu. These movements are the basis for kneading and sliding fingers, and play a key role in improving the timbre of the music. This technique is commonly used in different pieces of music, such as pulling "Jianghe Shui", which requires the basic skills of "pressing and kneading" and "rolling and kneading".
The left hand should be kept stable during practice. When the action is standardized, it can be transplanted to the real piano for experience. Note: The picture below is a slow exercise. After you are proficient, you can practice at different speeds.
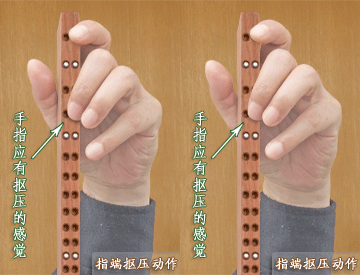
1. Finger picking and pressing

During practice, the base of the middle finger exerts force, resulting in the action of pulling and pressing the string. The movements shown in the picture on the left are indispensable in the "press kneading" and "finger kneading".
2. Finger scrolling action

When practicing, rely on the swing of the wrist to make the middle finger "roll". It is the basis of the "tumbling" action.
3. The finger movement

When practicing, rely on the up and down vibration of the arm to make the middle finger end produce a "squirm" action. This movement is the basis of the "arm vibrato".
4. Finger sliding action

When practicing, rely on the "lifting" and "swinging" movements of the arms and wrists to make the middle finger end "glide". This action is the basis of "slip kneading".
Erhu finger push and drag action
The "push and drag" action of the fingers is very commonly used in "sliding fingers". Generally, in the "push and drag" process where the tiger's mouth moves together, the wrist drives the fingers to slide, and the finger movements are passive. The following are two simple examples, in which the upper picture is the "push" action of the finger, and the lower picture is the "drag" action.
"push" action

The finger "push" action is generally used for the upward sliding of the finger, and is often combined with the change of the handle. In long-distance gliding, the general tiger's mouth should move. The picture on the left takes the outer string of D (1 5) ("7" slides to "2`") as an example. Here, the tiger's mouth movement method is used to simulate the "push" action.
During the exercise, relax the arm, press the middle finger on the hole position of "7", and start to slide up and down (at this time, the wrist has a downward "propulsion" action). On the real piano, the following points can be paid attention to during the whole promotion process:
. To use the fullest part of the flesh pad on the finger end to perform the sliding of the string.
. When starting to slide, there is a small movement of the wrist to turn straight, and this movement drives the middle finger to have a backward movement.
. Driven by the wrist, the middle finger slides upward until it reaches the "2`" sound.
Note: Generally, in short-distance gliding, the tiger's mouth can be in a fixed state, and the wrist movements are not obvious at this time, and the corresponding movements are mainly completed by the fingers.
"drag" action

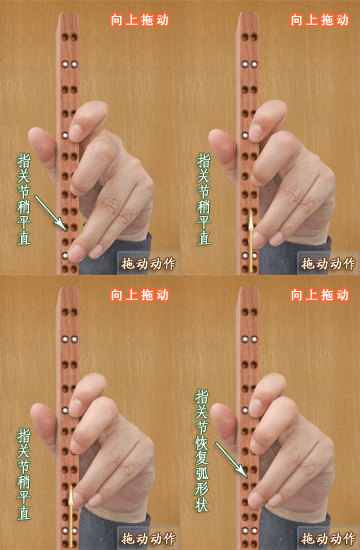
The finger "drag" action is often used to slide down the finger. The slide action shown on the left can be used for external strings such as D ("5`" slides to "3`"), G external strings ("2`" slides to "7"), etc. The picture on the left adopts the method of fixing the tiger's mouth.
The steps of the exercise are as follows:
1. Stretch the ring finger to the phoneme before sliding, and then drive the finger to perform an upward "drag" action by the palm (the ring finger has the feeling of being "drag" upward by the palm). At this time, the joints of the ring finger are slightly flat. Gradually bend to a normal arc shape.
2. When the "drag" is in place, it should quickly restore the appropriate pressure on the finger (the finger in the left picture is the ring finger). The entire left-handed shape should also return to its normal state in time.
During short glides, the jaws do not have to move at the same time because the fingers can be extended to the corresponding phoneme (as is the case in the left image). It's just that when the fingers are extended toward the high pitch, it is difficult for the knuckles to be in a normal arc state, especially for those with short hands, which can only be in a straight state.
In long-distance gliding, the tiger's mouth must move together. At this time, it should be noted that the arm and wrist drag the fingers to slide, and the fingers are passive. Likewise, once the finger slides into place, the joint of the pressed finger should return to its normal arc in time.
Finger "slip and tremble" technique

In the whole process of swaying in the picture on the left, the tones of the index finger press are:
![]()
A total of eight tones.
Note:
1. Practice gliding down from the sixth position (the index finger is located in the 10th row of the phoneme bar) to the second position (the index finger is located in the third row of the phoneme bar).
2. The index finger presses the basic sound, and the ring finger presses the vibrato. The interval relationship between the basic sound and the vibrato is a minor third, that is, the index finger and the ring finger form a minor third relationship.
3. Although the phoneme stick can ensure the correctness of each interval, the skill of "slipping and trembling" for long intervals is difficult and the knowledge is very deep. It needs to be combined with hard practice on the real piano. On the basis of slow practice pitch, gradually increase the speed.
 渝公网安备 50010702504639号