Fingering sequence of Erhu and detailed graphic teaching of reserved finger practice
Today, I will use the dynamic diagram of the erhu phoneme stick to explain the erhu fingering sequence and the practice method of retaining fingers. The erhu fingering sequence is the sequence in which the four fingers of the left hand press the strings when they continuously play various intervals, sound patterns and melody. Erhu reserved fingers It is called the reserved finger when two or more fingers are pressed on the string at the same time. It is usually used when the finger-changing action is too frequent in the music, or when a strong timbre is required, or when the little finger is pressing the string, or some special techniques. Below we focus on how to practice these two skills.

Erhu finger sequence exercises
Erhu fingering sequence is the order of fingering of the left hand, which is an important basis for left-handed techniques, such as the fingering principle of "superposition" and "alternation" between fingers 1-4. In actual performance, such as when playing a fast melody or when the melody suddenly changes during the performance, some fingers will feel awkward when pressing the fingers, causing tension in the arms, wrists and fingers, especially when using the little finger, sometimes serious Affects fast fingering and intonation. Therefore, for difficult fingering sequences, the corresponding fingering sequence exercises should be adhered to selectively, so as to cultivate the adaptability of finger spacing changes and promote the balanced development of each fingering ability.
Here are a few simple examples of exercises (in G major as an example):
1. The same chord according to the fingering order

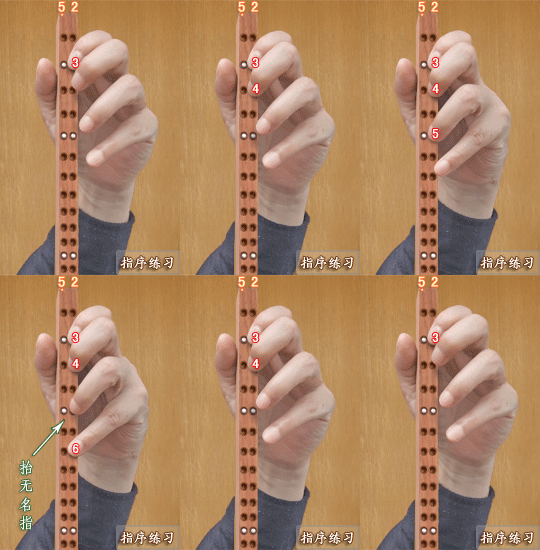
In the order of fingering, the most basic is the fingering order (superimposed fingering) when ascending, and the fingering order of descending is the descending fingering order. It is difficult to press the fingers when the 1-2 fingers or the 3-4 fingers are semitones. When practicing on the real piano, sometimes in order to improve the clarity of pronunciation, some small techniques can be used in pressing the fingers, as shown in the figure above.
The picture above uses G major external strings to practice the fingering sequence of "345 643". When pressing the finger, when the fourth sound "6" is pressed, the ring finger should be raised quickly, so that the sound of "4" pressed by the middle finger is very clear. Similarly, if you practice the last two sounds in "345 63", when your little finger presses "6", you should raise your middle and ring fingers as soon as possible, so that the last "3" sound is very clear. Such exercises will be of great help in improving the clarity of quick finger pressing. When practicing quickly, lower the height of the finger lift.
Note:
1. In the exercise of the "half-full" finger shape in the picture above, in addition to paying attention to the 1-2 fingers as semitones, it is also necessary to note that the 1-3 fingers are the major thirds. When pressing the little finger, it should not be used. Pull the other fingers down and keep the hand shape stable.
2. Before practicing the fingering sequence in the diagram, you can practice simple upward and downward fingering sequence.
3. In addition to the above exercises, you can also practice on the inner and outer strings of different positions. The most important thing is to improve the speed of pressing the fingers and the sensitivity of raising the fingers, so as to improve the clarity of playing on the real piano.
2. Changes in the fingering order of the inner and outer strings according to the fingering

The above picture shows the actions of pressing the fingers on the inner and outer strings of G major, in which the inner string adopts the upward superimposed fingering, and the downward adopts the continuous and decreasing fingering action. Note that the inner string is a "full and half" fingering, and the outer string is a "half full" fingering. Mastering the finger shape and the fingering sequence of the fingers, on the real piano, the pitch of the first position in the key of G will be basically guaranteed.
Note:
1. When pressing the little finger, other fingers should not be pulled down and the hand shape should be kept stable.
2. Different practice techniques can be used, such as the upward fingering or downward fingering for both internal and external strings.
3. The same chord "alternate" according to the order of the fingers

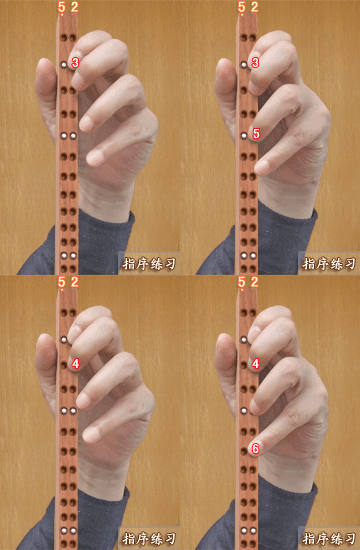
The above picture takes the fingering of the outer strings of G major as an example. The fingering order of the fingers is "3-5, 4-6". When you press the "5" sound, you should keep your index finger. Similarly, when you press the "6" sound, you should also keep your index finger and middle finger, which can enhance the effect of the exercise.
Note:
1. In the above picture, the interval between the fingers 1-3 is a minor third, while the interval between the fingers 2-4 is a major third. When pressing the little finger, the other fingers should not be pulled down and the hand should be stable.
2. When practicing fast, lower your fingers and press the height of your fingers.
Erhu reserved finger practice explanation
The pre-pressing of the finger - the reserved finger that can be used as the reference for other fingers, it should be pressed on the string in advance or as soon as possible, which is the pre-pressing technique of the finger.
Retention of the fingers - When pressing the fingers of the left hand, keep them on the strings as much as possible, and keep them on the strings as long as they can not be lifted. This is the finger retention technique.
The use of pre-press and hold technology can make the finger pressing simple and labor-saving, enhance the control of pitch and maintain the continuity of the phrase, reduce the noise of the pressing finger, and make the fingering of the left hand and the bow of the right hand well synchronized. Therefore, whenever possible, finger pre-press and retention techniques should generally be used.
Note: Finger pre-pressing and retaining technology should be comprehensively considered in practical applications, and retaining fingers must be used without affecting other aspects. Generally, the use rate of reserved fingers is higher in fast music, and less used in slow tempos, especially when it has an impact on vibrato, there is no need to reserve fingers. For example, the sound pattern of " " in the 1st and 2nd bars of the song "Happy Sending Gongliang" (F key) in order to make the grain stronger, the relevant teaching materials suggest that it is best not to keep fingers when playing. In addition, the use of the reserved finger is also suitable for each person. Some people's finger physiological conditions are not ideal, and sometimes it will be very difficult to use the reserved finger.
1. Use reserved fingers in fast-paced situations

When playing fast, continuous rhythms, keeping your fingers makes the fast progress smoother. For example, "6712 7121" for external strings in the key of D. When the speed requirement is very fast, then you should try to keep your fingers.
Note: During the initial practice, the fingers remaining on the strings may feel a little tense and awkward, but after a period of training, it will gradually ease.
2. The use of erhu retention refers to the positioning of the index finger

The use of the retention finger in the positioning of the index finger is an important erhu technique. Make the index finger the reference point on the interval relationship of the other fingers of the left hand, which is very beneficial to the control of the intonation, especially the little finger is correctly extended and pressed. For example, when playing (4 1) strings, (7 #4) strings, etc., it is difficult to master the tonality and pitch. You can use the index finger to cut the position to achieve correct performance.
The picture above shows that the index finger of D major is kept on the "1-raised" sound in the third position of the outer string. It can be seen from the picture that because the index finger is relatively fixed, the main phoneme is cut, which makes the pressing sound of other fingers. (especially the intonation of the little finger) becomes very easy.
Note: You can also keep fingers 1-2-3 on the strings during practice to enhance the effect of practice.
 渝公网安备 50010702504639号